
|
Darex Drill Grinder
Using a drill grinding machine is the quickest and most accurate method
of sharpening drills. There are many different types of drill grinding
machines used in the machining industry today. This unit will concentrate
on the Darex drill grinding machine (Figure 1).
|
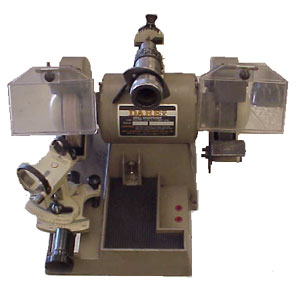
Figure 1 Darex Drill Grinder
|
|
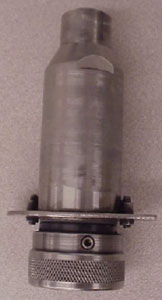
Figure 2
|
The Darex drill grinding machine will sharpen drills from 1/16 inch to
3/4 inch in diameter. The Darex drill grinder uses a collet chuck method
of holding the drill (Figure 2). This Darex drill grinding machine will
sharpen both cutting lips in one motion, assuring that both lip lengths are
equal. |
Darex Drill Grinder
Before we can begin learning how to grind the drill using the Darex drill
grinder, we must first learn the main parts of the grinder (Figure 3).

Figure 3 The main
components of the Darex drill grinder
Wheel Dressing
| A clean, free cutting wheel is important for accurate, cool grinding. To keep
wheel dressing to a minimum, reposition the drill sharpening action to different
areas of the wheel. Dress the wheel when the face of the wheel becomes
discolored or when grooves are present in the face of the wheel. To begin
dressing the wheel, insert the diamond dresser in the collet chuck. Loosen the
wing nut on the sharpening fixture. Set the point angle adjustment to 135
degrees (Figure 4). Re-tighten the wing nut. |
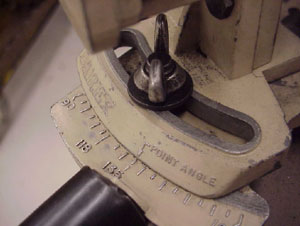
Figure 4 135-degree setting on the sharpening
fixture
|
|
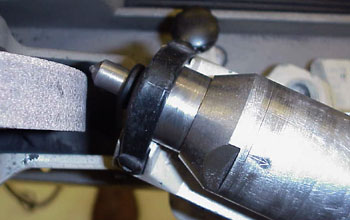
Figure 5 Wheel dressing point set off to the right of the
wheel
|
Retract the sharpening fixture using the feed knob. This will allow for
clearance between the diamond dressing tool and the wheel. Place the collet
chuck in the sharpening fixture. Turn the wheel positioning knob so that the
wheel dresser is 1/16 of an inch to the right of the wheel (Figure 5). |
| Hold the chuck and fixture firmly. Apply force to move the fixture, by hand,
past the face of the wheel and approximately 1/16 of an inch beyond the left
edge of the wheel (Figure 6). |

Figure 6 Dressing the wheel
|
Now turn the feed knob clockwise to remove the desired material and then move the
fixture and diamond by hand slowly across the face of the wheel. Note: Traveling
too quickly across the face of the wheel will produce a rough finish on the
wheel, which will result in a rough finish on the drill face. Repeat the dressing
steps until the wheel face is flat and clean. Do not over heat the
diamond. Remove the diamond dresser from the collet and place the diamond
dresser back in the appropriate place.
Setting Up to Grind a Given Diameter Drill
| Move the drill size lever on the relief setting fixture so that the arrow is
the same as the drill size you are going to grind (Figure 7). |
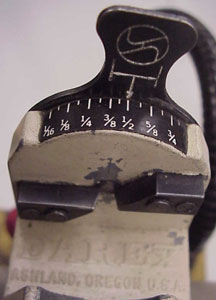
Figure 7 Setting the drill size on the relief
setting fixture
|
Insert the drill into the chuck with about 1 inch of the drill sticking out
of the end of the chuck. Adjust the drill grip knob to grip the drill loosely.
At this time the drill should be able to be slid back and forth easily.
| Loosen the chuck grip lever on the relief setting fixture (Figure 8). Insert
the chuck into the setting fixture as far as it will go. The point of the drill
should butt up against the black dot on the back plate of the fixture and be
pushed into the chuck the proper length. You may have to rotate the chuck
slightly to ensure that the point of the drill butts up against the back plate. |
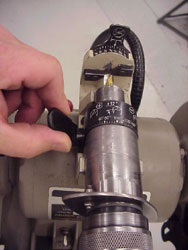
Figure 8
|
|
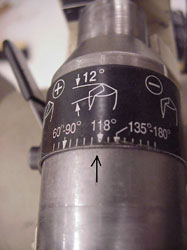
Figure 9 Locating the drill for lip relief
|
Next grasp the wing cams (Figure 8)on the collet chuck and rotate the chuck CLOCKWISE
until the alignment arrow on the collet coincides with the 118 degree line
on the lip relief scale (Figure 9). |
Make sure that the drill point stays in contact with the back plate. Never
turn the collet chuck counter-clockwise. If you missed the mark, go around again
in a clockwise direction. This setting controls the relief or clearance angle.
| Secure the drill in the chuck by gently depressing the grip lever and turning
the knurled grip knob until the drill is tight in the chuck (Figure 10). Loosen
the grip lever and remove the chuck from the relief setting fixture. Tighten the
knurled grip knob again by hand to insure the drill doesn’t slip in the collet
chuck. |
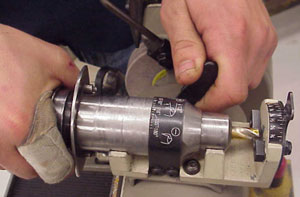
Figure 10
|
| If necessary, loosen the wing nut on the angle setting gage and set the
point angle to 118 degrees for a general purpose drill point angle (Figure
11). Retighten the wing nut. Back the feed knob all the way out to ensure
clearance between the drill and the wheel. |
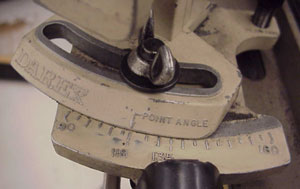
Figure 11 Setting the angle gage for a
118-degree drill point angle
|
Grinding
the Drill
| Insert collet chuck into the sharpening fixture. Be careful not to bump
the drill point into the grinding wheel. Adjust the fixture positioning
knob so that the drill will make contact in the center of the wheel face. Turn
on the motor. Rotate the chuck in a clockwise direction while lightly
holding the wing cam against the post (Figure 12).
|
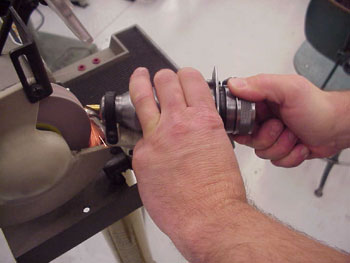
Figure 12 Twist the collet chuck quickly
to avoid burning the drill point.
|
Simultaneously advance the drill point to the grinding wheel by turning the
feed knob until the drill makes contact with the wheel. Advance the feed knob
three graduations. Using two hands and always going in a clockwise direction,
twist the collet chuck quickly, smoothly, and evenly. Each successive twist
sharpens a drill lip. Continue until sparking stops. (The chuck should be rotated
quickly to avoid heat being built up in the drill.)
Advance the feed knob as before and repeat until the drill appears clean and
sharp. Check for lip clearance relief.
|