
|
General Shop Safety -
Rigging & Lifting
|
This information sheet introduces the machine shop student to the basic, acceptable lifting and rigging techniques.
It explains the equipment and operations necessary for safe rigging and lifting. This document is not intended to show the student how to perform rigging and lifting, but to help
him/her recognize safe and unsafe rigging and lifting practices.
Rigging
Rigging is the preparation of a load prior to being moved. In this unit we will concentrate on cable sling rigging, chain sling rigging, and synthetic web slings.
Wire Rope/Cable Slings

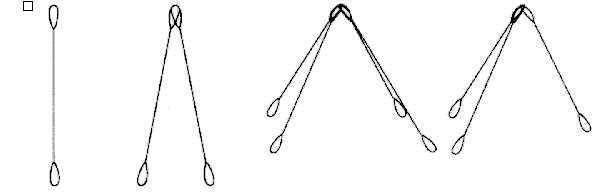
A sling is a synthetic webbing designed in a configuration for hoisting, lifting, and lowering applications (Figure 1).
 |
|
(A)-Single Vertical
|
(B)- 2-Leg Bridle
|
(C)-4-Leg Bridle
|
(D)-3-Leg Bridle
|
 |
|
(E)-Single Wrap Basket
|
(F)-Double Wrap basket
|
(G)-Two Single Basket |
(H)-Inverted Basket and 2-Leg Bridle
|
|
Figure 1 Common configurations of cable
sling hitch types |
Cable slings or wire rope slings are made up of individual strands of wire. The number of strands
and wires, the type of material, and the nature of the core will depend on the intended purpose of the wire rope. We must always determine the weight of the load before we can begin selecting the sling type.
As with any rigging and lifting efforts, we visually inspect all cable slings before use. Remove from service if the following conditions are present: See also Figure 2.
- Ten randomly distributed broken wires in one rope lay, or five broken wires in one strand in one rope lay.
- Wear or scraping of outside wires reducing the individual wire diameter by 1/3.
- Kinking, crushing, bird caging or any other damage resulting in distortion of the wire rope structure.
- Evidence of heat damage.
- End attachments cracked, deformed, or worn.
- Corrosion of rope or end attachments.
|
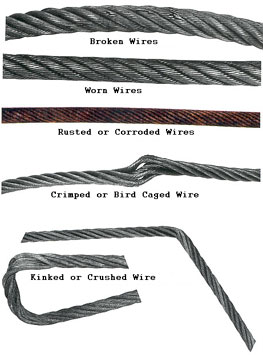
Figure 2 Visual signs of misused or
worn out cables |
When using a wire rope sling always follow these safety precautions:
| 1. A cutting edge cuts the life of the sling. Use blocking, padding, or a corner saddle when the cable must go around sharp corners (See Figure
3).
2. Remove any kinks in the sling before using. |
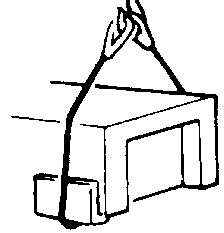
Figure 3 Protect the sling from sharp
corners
|
| 3. Use a sling large enough for the load. The smaller the angle of the sling the lower the lifting capacity. |
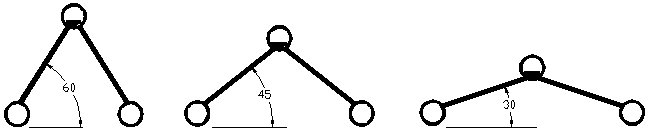
Figure 4 Estimated rating for Ľ-inch cable
slings using different sling angles |
4. Do not jerk loads. Jerking may double the stress on your sling. Lift loads gradually.
5. Hang the sling up after every use. This will help to keep it clean, undamaged and ready for use for the next job.
Chain Slings
Try to avoid using chains when it is possible to use wire rope. The failure of a single link of a chain results in the complete failure of the chain, whereas a cable is made up of many wires and strands, and they must all fail before the rope breaks. Chains give no warning as to when they are going to fail. A wire rope will show visible signs of impending failure. Chains are better suited for certain jobs as they will withstand rougher handling and they won’t kink. Chains are much more resistant to abrasion and corrosion than wire ropes
are. Chains are well suited as slings in the machine shop for lifting heavy castings. Use the following chain safety tips as a guide.
- Take up slack, then start to load slowly. A chain has no elasticity and does not react well to shock loading.
- Never shorten a chain by tying a knot in it. A chain has its maximum strength with the load running in a straight line.
- Always use softeners on the corners of rectangular loads.
- Lift from the center of hooks. Avoid lifting from the point of the hook.
- Distribute the load evenly on all legs.
- Inspect chains regularly. Look for elongated links.
- Never
exceed the estimated rating capacity of the chain.
- Don’t drop loads onto the chain.
Synthetic Web Slings
| Synthetic web slings are used extensively in the machine shop for rigging purposes (Figure 5)
because they are easy to use and they won’t mar or scratch finished surfaces. Web slings are usually made of
nylon or polyester. Nylon has a stronger rating than polyester does. |

Figure 5 Double eye nylon
sling
|
Synthetic web slings, because of their flexibility and elasticity, are a very popular rigging tool. The material with which these synthetic slings are made allows them to be very flexible, but it also makes them susceptible to heat and sharp edges. Synthetic web slings must be well taken care of, and the user must always be aware of sharp corners, welding sparks, and metal chips.
Slings used in environments where they are subject to continuous exposure to ultra-violet light should be proof tested to two times the rated capacity annually, or more frequently depending on
the severity of exposure.
Hitch Types
Double Choker Hitch - The double choker hitch seems to be preferred by many good riggers because it is twice as strong as a single choker hitch in the same sling type (Figure 6).
When this hitch is made in the right way, both legs will automatically equalize over the crane hook. However, when it is made wrong, there is usually no equalization and one of the legs will support most of the load.
 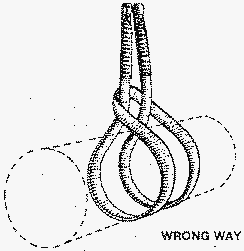
Figure 6 Double choker hitch correctly
and incorrectly performed
Basket Hitches - Basket hitches, whether single or double, may be used successfully in a variety of applications. However, they have inherent limitations
as indicated in Figure 7.

Right Way |
Wrong Way |
| Figure 7 Basket
hitches correctly and incorrectly performed |
| Sling Hitches
Loads vary in physical dimensions, shape, and weight. Where and how to attach slings is important to a Rigger (Figure 8). |
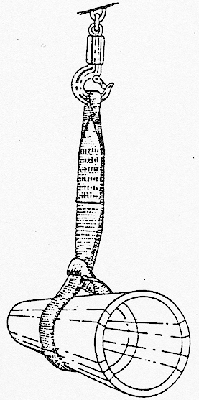
Figure 8 Sling Hitch
|
| Choker Hitch - In a contact sling hitch, the sling passes entirely around the load. In its simplest form, the sling has a loop or eye on each end, and is referred to as a choker sling or choker (Figure 9). One loop passes through the other forming a slip noose. Where overhead space is limited, a double wrapped choker hitch is acceptable. |
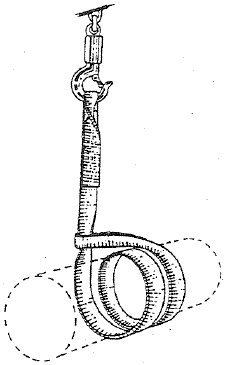
Figure 9 Choker Sling
|
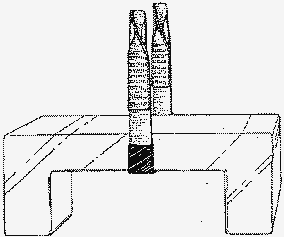
Adjusting Hitch – One of the useful hitches available to riggers is the adjusting hitch (Figure 10). It is particularly useful when lifting an object that is heavier on one end than the other. The adjusting hitch makes it fairly easy to adjust the length of the legs of the bridle to maintain the load level. This hitch should not be loaded any more than a single basket hitch.
 
Figure 10 Adjusting Hitch used correctly and incorrectly on rolls
| The effective length of the adjusting hitch can be easily changed to suit job conditions. Once the weight of the load comes onto the sling, no further change in length occurs (Figure 11). |
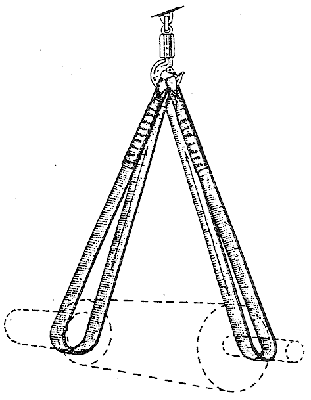
Figure 11 Adjusting Hitch
|
Lifting
Lifting should only be done by a certified lift or crane operator. Before a lift can be used, the operator must know all of the functions of the lift. Although this unit of instruction is not intended to show you how to operate a crane or hoist, here are some safety tips to adhere to while around lifting devices.
- Start and stop any lift slowly.
- Lift the load straight up to ensure that the load does not swing.
- When raising, lowering, or moving the load, ensure that it will safely clear nearby equipment.
- Make all moves slowly to prevent swinging.
- Personnel are not permitted to "ride" on the hook or the load.
- Make certain that no personnel are ever permitted to pass under a load.
- Under no circumstances are "side pulls" permitted.
- Make sure that the rigging and the hoist will handle the specified load weight.
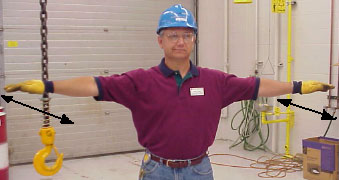
- Signals for crane movement are only given by one person.
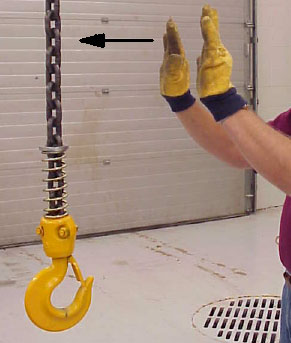
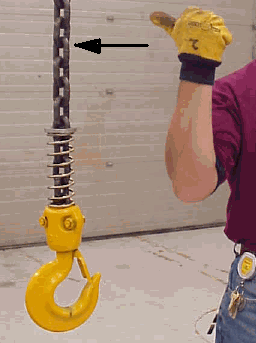
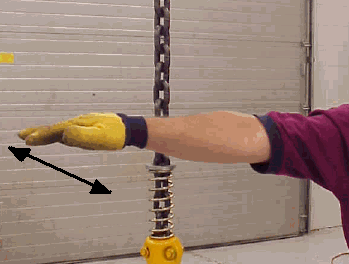
Signals for Crane Movement

|
Hoist-With forearm vertical, and forefinger pointing up, move hand in a small horizontal circle. |
|
Lower-With arm extended downward, and forefinger pointing down, move hand in a small horizontal circle. |
 |
 |
Bridge Travel - With arm extended forward, and hand open and slightly raised, make
a pushing motion in the direction of travel. |
|
Trolley Travel-With palm up, fingers closed, and thumb pointing in the direction
of motion, jerk hand horizontally. |
 |
 |
Stop- With arm extended palm down, move arm back and forth. |
|
Emergency Stop-Both arms extended, palms down, move arms back and forth. |
 |
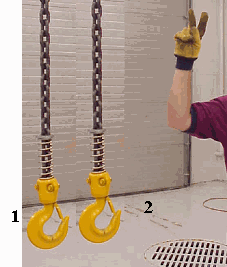 |
Multiple Trolleys-Hold up one finger for block marked "1" and two fingers for block marked "2." Regular signals follow. |
|
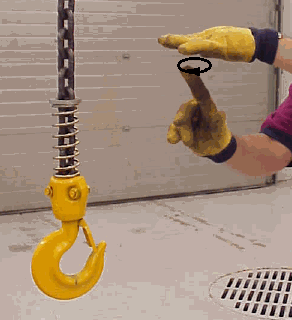
Move Slowly-Use one hand to give any motion signal and place the other hand motionless in front of
the hand giving the signal. The signal in the picture is HOIST SLOWLY.
|
 |
|